The Essential Guide For Maintaining Your Wooden Table
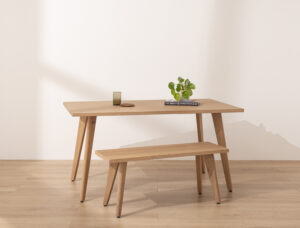
When you’re looking to purchase a dining room table it is important to look at the material used to make the dining table. To ensure that your dining table stands the test of time we would advise you to opt for one made with solid wood. It is the tightly packed fibres in solid wood that make it so structurally strong. Tables made with cheaper materials such as plywood, particleboard and MDF are likely to sag over time, whereas solid wood will remain strong and can last a lifetime if cared for correctly.
Nevertheless, a wooden dining table may be strong but it is a natural product and needs to be appropriately looked after and cared for to ensure that it stands the test of time and keeps its attractive appearance.
Contents
- Protecting and Caring for Your Wooden Table
- Cleaning Your Wooden Table
- Removing Scuff Marks From a Wooden Table
- Fixing Other Wooden Table Ailments
Protecting and Caring for Your Wooden Table
Naturally, over time you may notice wear and tear on your dining table. There are some small things that can be done on a daily basis that will protect your dining table from cosmetic and structural damage. These are time friendly actions that will guarantee that your table will not only last a long time, but remain in top quality condition.
- When planning the location of your dining table it is important to consider how close the nearest heat source will be to the table. For example, placing your table within 1-2 metres of a radiator or fireplace could be potentially putting your tables structural integrity at risk. Direct heat can cause the fibres in the wood to shrink which may result in the wood splitting or cracking along the grain, or where there are joins across the tabletop.
- It is extremely important that your dining table is positioned out of direct sunlight. On summer days the heat generated from the sun can again cause the wood to split or crack. If direct sunlight is on your dining table during the year it will most certainly cause discolouration of your tabletop. This damage is usually irreversible depending on how deep the discolouration has penetrated the solid wood. On those beautiful sunny days, we recommend your blinds or curtains are closed slightly to ensure there’s no direct sunlight on your tabletop for prolonged periods of time. If this is completely unavoidable, for example, if the table is going in an orangery or conservatory, then we would strongly recommend that you buy directly from a manufacturer and specify a UV resistant top finish dining table.
- If you have an extending dining table and you have removable eaves, it is important to store the eaves flat to avoid any warping of the eaves. It’s also important they are kept somewhere dry; ideally the eaves would be stored in the same room as the dining table so they are both kept in the same humidity at all times. If they are stored in a loft or a garden shed the wood may swell due to the increase of moisture in the air.
- As we covered in the previous point, moisture can wreak havoc on your solid wood dining table, so ensure that if any food or liquid gets split directly onto your dining table, it is cleaned immediately. If liquid is left on the table surface it will first start to breakdown the finish and then find its way into the wood. This can leave permanent watermarks or even cause swelling and structural damage to your tabletop.
- To further protect the finish of your dining table, you can make sure there are limited objects in contact with the tabletop. We strongly recommend that placemats are used at mealtimes for plates of food and cutlery as these are sharp objects and can easily scratch or gauge your tabletop.
- Ensure that no piping hot pots, pans or serving dishes are placed directly onto your solid wood dining table. Make sure to use heat resistant placemats for hot pans or serving dishes to prevent burn marks and heat damage to the solid wood.
- When drinking hot or cold drinks on your table, try to use coasters where possible. Hot drinks can ruin the tabletop finish or leave irreversible heat damage. Cold drinks can also leave moisture on the table – over time this will wear away the tabletop finish and may cause irreparable water damage.
- We think investing in a complete table cover for occasions is an extremely wise thing to do. These can be a table-saver for dinner parties where you have multiple guests and anticipate things to get a little ‘messy’ and mass spillages. We agree it’s a shame to cover up the beauty and character of a solid wood dining table and we know you want to show it off to your friends and family. However, it’s more of a shame when you cause irreparable damage to it.
- If you have a dining table with a wax or oil finish, they will require ongoing maintenance and you will need to ensure your table is regularly treated. This is usually every 3-6 months depending on how often your table has been used. Be sure to opt for a natural wax; either a beeswax, carnauba wax or a blend of both would be our choice. Be extremely careful not to opt for a silicone-based wax, as these build a residue on the top surface of solid wood that is extremely difficult to remove.
- It’s very important that you are careful when cleaning your table. Be sure to avoid harsh chemical cleaners or abrasive cloths as these can damage the finish on your wooden dining table.
Cleaning Your Wooden Table
It is important to regularly clean your dining table, especially since this is a place where you and your family will regularly eat. When your table is wood you have to be extremely careful when choosing off the shelf cleaning products as many of these products contain harsh chemicals and/or abrasives that will break down the top finish of your wooden dining table and could cause irreversible damage.
Our chosen cleaning methods will not only kill germs but will also be kind to your wooden table; making it safe to eat off your table and ensuring it lasts the test of time.
How to Clean a Wood Table With Vinegar
If your table is finished with oil, wax, varnish or lacquer, the following five steps are our recommended process for cleaning your table.
- Fill a bowl with warm water and add a small amount of white vinegar, using around 1-3 tablespoons of white vinegar to one cup of warm water. White vinegar is an acidic liquid so it’s extremely important that it is diluted with water. It’s the acidity that makes white vinegar ideal for disinfecting a table surface if food has been spilt onto the table. Be sure you have the right ratio between vinegar and water – you can do this by starting with a single tablespoon of vinegar and a cup of water and test a small area on your table before cleaning the whole surface. We would advise a more diluted solution for wax and oil finishes (1-2 tablespoons white vinegar) and a stronger solution for varnish and lacquer (2-3 tablespoons).
- It is important that you use a soft, non-abrasive cloth as a rough textured cloth or the coarse side of a sponge will damage the finish on your table. We would recommend a microfiber cloth to achieve the best result. If your dining table is rustic with a textured surface we would recommend a small soft thistle brush to clean the surface before applying the vinegar solution.
- When you dip the cloth into the water ensure it is not saturated with the vinegar solution as the cloth only needs to be dampened. Too much liquid on a tabletop surface is never a good thing, even if only for a short period of time.
- After you have fully wiped over the table with the cloth, rinse the same cloth with clean water and wipe the table again. This will remove the white vinegar residue and any other dirt.
- Get a separate dry, soft cloth and ensure the table is as dry as possible. Any moisture left on the table will affect the finish long term, as moisture will slowly start to break down your tabletop finish.
If you don’t have any vinegar to hand you can always use diluted washing up liquid to clean your table following the same procedure above. Be mindful that this may not be as effective in killing bacteria, but will act as a quick fix before your next shop.
No amount of cleaning will detract from accidental damages which are likely to occur on your dining room table. Seeing as it’s such a well-used piece of furniture in the home it’s likely at some point that your lovely wooden dining table will receive some sort of cosmetic damage over time, such as a scratch or two.
Removing Scuff Marks From a Wooden Table
We know all too well that the dining table is a well-used piece of furniture in the home – from daily family meals to kids doing their homework, it’s no surprise that over time your dining table will eventually start showing signs of wear and tear.
Sometimes these are unavoidable, so we have some easy DIY tips and tricks to keep your wooden table looking brand new.
How to Remove Scratches From Wood Furniture With Sandpaper
Here are some simple steps on how to remove light scratches or areas of damage on your dining table:
- Most light or surface scratches can be removed by lightly sanding the area with a sanding sponge or sanding block. Make sure you always sand in the direction of the grain. This is because sandpaper puts scratches into your dining table, so the lower the grit (80, 120) the coarser the paper and the deeper the scratches. Going with the grain of the wood allows the scratches to blend in with the natural grain. If you go across the grain the scratches will not blend in and will stand out.
- Light scratches can be removed by initially using fine sandpaper (180 grit) before using something lighter (240 grit) to blend in and minimise the scratches caused by the 180 grit. If the scratches are deeper, you may want to consider a medium sandpaper (120 grit) before this step.
- Finish sanding the area using a finer sandpaper (240 grit) in the direction of the grain -this will blend in and remove the scratches caused by the lower grit paper. Make sure that you never jump from coarse sandpaper (120 grit) straight to fine sandpaper (240) as you will see the scratch marks from the coarse paper.
- Once you’ve removed the scratch or mark, ensure you clean all of the dust off the dining table, before refinishing using the oiling or waxing.
Sometimes sandpaper isn’t required to remove really light scratches, you can remove them with some everyday day household items.
How to Remove Scratches From Wood Furniture With Vinegar
You’ll need:
- White vinegar (Cider vinegar will also work).
- Olive oil.
- Two old cotton rags.
Why do we recommend white vinegar?
White vinegar typically consists of 5% acetic acid and 95% water. These properties not only make it an ideal cleaning solution but they also help repair minor scratches. The acetic acid will work into the existing finish around the scratch to help fill it.
Why do we recommend olive oil?
To repair light scratches you’ll need a stronger solution of white vinegar than you would use to simply clean your table. It’s important to mix the white vinegar with oil, as too high of a concentration of acetic acid can cause damage to the tabletop finish. The olive oil will also improve the overall desired result as it soaks into the exposed wood within the scratch. This helps achieve a darker colour matching the rest of the finish, whilst also protecting the wood from moisture. Lastly, olive oil is a natural product that is food safe, so perfect for using on a surface that you eat from.
Nevertheless, we strongly recommend you always apply a solution to a small test area initially to make sure it doesn’t damage the top finish.
Here’s our quick 5 step process to remove scratches with vinegar:
- Mix 100ml (one part) of white vinegar with 200ml (two parts) olive oil in a bowl or a cup and mix well.
- Dip a soft cotton rag into the cup so that the solution gets soaked into the rag. Squeeze the rag so that there is no excess moisture dripping off it.
- Apply the soaked rag to your tabletop over the scratched area. Rub in a circular motion over the scratched area and then finish by rubbing the cloth with the grain.
- Let the solution sit on the tabletop surface for 2 minutes. This allows the oil to soak into the scratches.
- Get a clean fresh rag and wipe off the excess solution. Then rub along the grain. Ensure there is no residue left on the tabletop.
This process can be repeated several times until the scratches disappear. If the scratches don’t seem to disappear it could be because your scratches are too deep. If your scratches are too deep then scroll down and continue reading on the next section; how to remove deeper scratches with Crayons.
How to Remove Scratches From Wood Furniture With Crayons
For scratches that are slightly deeper and can’t be removed with vinegar, try using a child’s crayon. A crayon is a fantastic way to remove scratches and here are three reasons why:
- Strength – A crayon is made from a distinct selection of waxes. These waxes have a strengthener added to them to ensure they have structural strength and hold together well in crayon form. So once they’ve filled the small void or scratch on your table, they will become solid like the rest of the wood.
- Colour Choice – Crayons come in a variety of colours which makes it relatively easy for you to find the perfect match. We’ve chosen the closest wood colours from the Crayola range for you. For natural wood colour tables, we advise ‘Bisque’ and ‘Gold’ Crayola crayons. For medium brown wood tables we advise ‘Light Brown’ and ‘Golden Beige’ Crayola crayons. Finally, for dark wood tables, we advise ‘Fuzzy Wuzzy’ and ‘Earth Tone’ Crayola crayons. If you’re unsure of what colour crayton to pick, we recommend you always go darker than the actual wood colour of your table as this will give the most natural look.
- Food Safe – Crayons are made to be suitable for children to use and young children love to put everything in their mouths. As the colours added to the crayons are non-toxic, using them for your dining table won’t be a problem.
Now you know why crayons are great for fixing table scratches, here are five simple steps on how to do it:
- Ensure your table is clean and free of any dust and debris, especially around the area that you would like to repair. If the surface isn’t completely clean it can impact the adhesion between the wax and wood.
- Select the crayon colour that matches your dining table wood colour. We would advise that you opt for a darker colour over something lighter, as this improves how the repair blends in with the rest of the surrounding wood.
- Rub the crayon over the scratched area both sideways and lengthways until the scratch is full of wax.
- Use a credit card to gently scrape any excess wax off the table. Ensure that the table surface is now level where the scratch used to be.
- Use a clean cotton rag to buff the wax infill- this will help blend the wax into the tabletop.
This process can be repeated several times to achieve a smooth and flat surface. However, sometimes the scratches or voids may be too deep and wide to eliminate using the method above. If that’s the case, then keep reading.
Fixing Deep Scratches in Wood Tables
- Use a specialised wood filler that matches the colour of your table to fill in the deep scratch. You can use your finger to work it into the scratch, making sure there are no gaps of air.
- Use a putty knife or an old credit card to smooth the surface and remove any excess wood filler from the table.
- Wait for the filler to dry – drying times can vary so ensure you read the packaging for accurate drying times.
- Use fine sandpaper (180 grit or 240 grit) on the dried area around the scratch. Always sand by following the direction of the wood’s grain.
- Apply appropriate oil or wax using the steps above.
Fixing Other Wooden Table Ailments
In the current climate, the dining table is proving to be a multifunctional piece of furniture. Whether you use it for eating meals, a home office desk for those working at home, a school classroom for the kids or working on your arts and crafts skills. This opens your wooden table up to a wide range of potential damages, there are many tips and tricks that you can use to ensure your table maintains good health.
How to Remove Biro From a Wooden Table
A dining table is the perfect place for home working and schooling. However, one common problem that’s likely to occur is getting biro ink onto the surface of your dining table.
Before we recommend the process to remove biro, it’s important to point out that the success of the process will depend on how your dining table is finished. If your wooden dining table is a wax or oil finish it can be a lot more difficult to remove the biro – the steps below will most likely strip the wax and oil from the area of the biro so the area will have to be re-oiled/waxed.
Varnish and Lacquer finishes provide a strong protective layer over the top surface of the wood. This means that the ink is less likely to have penetrated the wood so the biro can be more easily removed.
We recommend that you squeeze some rubbing alcohol or even hand sanitizer on the area where there is biro or ink stains and let it sit for 10 minutes. If the ink seems to be trapped within the grain of a wooden table, it is best to use a cotton ball or cloth and rub over the ink in circular motions to help penetrate the trapped ink.
Ensure that the table is wiped and there is no alcohol left on the table. If there are any remnants of ink left on the table you can repeat this process.
How to Remove Water Stains From a Wooden Table
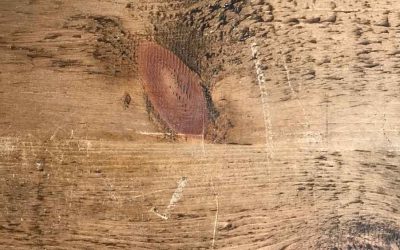
Nothing quite stands out like a white water stains on a dining table. Water stains are often in the form of white rings since the main culprit is the bottom of cold glasses or hot mugs being put directly on top of a wooden table. However, they’re not always in a ring form as any cold or hot item can create marks, such as hot serving dishes or spilt drinks and food. The white marks cloudy appearance is due to water being trapped on the tables surface finish. This is from either the condensation of the cold items or the steam of the hot items.
It’s important to note that if your watermark is not white but is a dark brown or black colour, this means that the water has penetrated through your table finish and caused damage to the wood itself. This can usually be fixed by sanding the area down and re-applying a protective finish, although this depends how deep the damage is into the wood.
If you have white cloudy watermarks on your table the best thing to do is try to remove the trapped water in the top finish. The easiest way to do this is to use a hairdryer or heat gun; the heat will evaporate the water helping it escape from the finish. Here’s some simple steps to ensure you remove the stains safely without damaging your table further:
- Set your hairdryer to medium to high temperature.
- Hold it around 10cm away from your tabletop and move it side to side over the stained area. You shouldn’t smell any burning – if you do make sure you lower the heat or go further away from the tabletop.
- After 2-3 minutes you should start to see the stain start to fade.
- Keep it over the area for 15-20 minutes or until the stain has disappeared fully.
If the watermark has been on the table for a while it may not completely disappear. We advise that you now follow this step by applying a tablespoon of Mayonnaise to the area and covering with a piece of kitchen towel overnight. This may seem odd but mayonnaise contains a mixture of oil and vinegar. The oil will slowly seep into the wood overnight helping restore the table’s colouring, whilst the vinegar contains acetic acid which helps break down the surrounding finish allowing the restored area to blend in with the existing finish.
Overall, these little tips and tricks should help save your dining table from water stains.
How to Prevent Water Rings on a Wooden Table
Unfortunately, if you are reading this then you have likely already experienced water rings on your wooden table. Here are some of our top tips to prevent water rings on a wooden table in future:
- You need to avoid putting cold and hot drinks directly onto your wooden table. It is vital that you protect your table from moisture and heat, so make sure your coasters are stored close or on your table ready to use.
- Don’t place hot or cold plates or serving dishes directly on your table, instead use a placemat to protect your table.
- Wipe up spillages off your table as soon as you notice them.
- When cleaning your table don’t let it air dry. Use a dry towel to ensure all the moisture is removed from the table straight away.
It’s important that you care for your wooden table to improve its longevity in your home. Click here if you’re after a guide to maintaining and caring for oak furniture more generally.
Your content goes here. Edit or remove this text inline or in the module Content settings. You can also style every aspect of this content in the module Design settings and even apply custom CSS to this text in the module Advanced settings.
Considering A New Dining Table?
Our stunning dining tables are handmade with love here in the UK and come in a wide range of styles; from contemporary to rustic and farmhouse styles. We're certain you'll find one that looks great in your home.
Just give them a view at the very least 🙂